City of Hero ( Soerabadja )
Rabu, 09 Mei 2012
Senin, 30 April 2012
| KEUNGGULAN ISLAM | |||
| Iyyakana'budu wa iyya kanasta'in | |||
|
|||
Iyyakana'budu wa iyya kanasta'in (Hanya Engkaulah yang kami ibadahi dan hanya kepada Engkaulah kami mohon pertolongan).
Para ahli qira'at sab'ah dan jumhurul ulama membacanya dengan memberikan tasydid pada huruf ya' pada kata iyyaka dibaca dengan memfathahkan huruf nun
yang pertama, menurut bacaan seluruh ahli qira'at. Menurut bahasa, kata
ibadah berarti tuntuk patuh. Sedangkan menurut syariat, ibadah berarti
ungkapan dari kesempurnaan cinta, ketundukan, dan ketakutan.
Didahulukannya maf'ul (objek), yaitu kata iyyaka,
dan (setelah itu) diulangi lagi, adalah dengan tujuan untuk mendpatkan
perhatian dan juga sebagai pembatasan. Artinya, "Kami tidak beribadah
kecuali kepada-Mu, dan kami tidak bertawakal kecuali hanya kepada-Mu."
Dan inilah puncak kesempurnaan ketaatan. Dan dien (agama) itu secara
keseluruhan kembali kepada kedua makna di atas.
Yang demikian itu seperti kata sebagian ulama salaf,
bahwa surat Al-Fatihah adalah rahasia Alquran, dan rahasia Al-Fatihah
terletak pada ayat Iyyakana'budu wa iyya kanasta'in (Hanya Engkaulah yang kami ibadahi dan hanya kepada Engkaulah kami mohon pertolongan).
Penggalan pertama, yakni "Hanya kepada-Mu kami
beribadah" merupakan pernyataan lepas dari kemusyrikan. Sedangkan pada
penggalan kedua, yaitu, "Hanya kepada-Mu kami memohon pertolongan"
merupakan sikap berlepas diri dari upaya dan kekutan serta berserah diri
kepada Allah SWT.
Makna seperti ini tidk hanya terdapat dalam satu ayat Alquran saja, seperti firman-Nya, "Maka beribadahlah kepada Allah dan bertawakallah kepada-Nya. Dan sekali-kali Rabbmu tidak lali dari apa yang kamu kerjakan." (Huud: 123).
Dalam ayat tersebut (Al-Fatihah: 5) terjadi perubahan bentuk dari ghaib (orang ketiga) kepada mukhathab (orang kedua, lawan bicara) yang ditandai dengan huruf kaf pada kata iyyaka.
Yang demikian itu memang selaras karena ketika seorang hamba memuji
kepada Allah, maka seolah-olah ia merasa dekat dan hadir di hadapan-Nya.
oleh karena itu, Dia berfirman, "Iyyakana'budu wa iyya kanasta'in."
Ini merupakan dalil yang menunjukkan bahwa pada
awal-awal surat Al-Fatihah merupakan pemberitahuan dari Allah SWT yang
memberikan pujian kepada diri-Nya sendiri dengan berbagai sifat-Nya yang
Agung, serta petunjuk kepada hamba-hamba-Nya agar memuji-Nya dengan
pujian tersebut.
Dalam shahih Muslim, diriwayatkan dari al-'Ala' bn
Abdur Rahman, dari ayahnya, dari Abu Hurairah ra, Nabi saw bersabda,
"Aku telah membagi salat dua bagian antara diri-Ku dan hamba-Ku. Bagi
hamba-Ku apa yang ia minta. Jika ia mengucapkan, 'Segala puji bagi
Allah, Rabb semesta alam', maka Allah berfirman, 'Hambaku telah
memuji-Ku'. Dan jika ia mengucapkan, 'Yang menguasai hari pembalasan',
maka Allah berfirman, 'Hamba-Ku telah memulikan-Ku'. Jika ia
mengucapkan, 'Hanya kepada Engkaulah kami beribadah dan hanya kepada
Engkaulah kami mohon pertolongan', maka Allah berfirman, 'Inilah bagian
antara hamba-Ku dan diri-Ku. Untuk hamba-Ku apa yang ia minta'. Dan jika
ia mengucapkan,'"Yaitu jalan orang-orang yang telah Engkau enugerahkan
nikmat kepada mereka, bukan (jalan) mereka yang dimurkai (Yahudi), dan
bukan (pula jalan) mereka yang sesat (Nashrani)', maka Allah berfirman,
"Ini untuk hamba-Ku dan bagi hamba-Ku pula apa yang ia minta'."
Iyya kana'budu didahulukan dari wa iyya kanasta'in,
karena ibadah kepada-Nya memrupakan tujuan, sedangkan permohonan
pertolongan merupakan sarana untuk beribadah. Yang terpenting lebih
didahuukan dari sekedar penting, wallahu a'lam.
Jika ditanyakan, lalu apa makna huruf nun pada firman Allah SWT, "Iyyakana'budu wa iyya kanasta'in," jika nun
itu dimaksudkan sebagai bentuk jama', padahal orang yang mengucpkan
hanya satu orng, dan jika untuk pengagungan, maka yang demikian itu
tidak sesuai dengan kondisi?
Pertanyaan di atas dapat dijawab bahwa yang dimaksudkan dengan huruf nun
(kami) itu adalah untuk memberitahukan mengenai jenis hamba, dan orang
yang salat merupakan salah satu darinya, apalagi jika orang-orang
melakukannya secara berjamaah. Atau, imam dalam salat memberitahukan
tentang dirinya sendiri dan juga saudara-saudaranya yang beriman tentang
ibadah, yang untuk tujuan inilah mereka diciptakan.
Ibadah merupakan maqam (kedudukan) yang sangat
agung, yang dengannya seorang hamba menjadi mulia, karena
keberpihakannya kepada Allah Ta'ala saja, dan Dia telh menyebut
Rasul-Nya sebagai hamba-Nya yang menempati maqam yang mulia. Firman
Allah, "Maha Suci Allah yang telah memperjalankan hamba-Nya pada suatu
malam." (Al-isra': 1).
Allah telah menyebutkan Muhammad saw sebagai seorang
hamba ketika menurunkan Alquran kepadanya, ketika beliau menjalankan
dakwahnya dan ketika diperjalankan pada malam hari. Dan Dia
membimbingnya untuk senantiasa menjalankan ibadah pada saat-saat hatinya
merasa sesak akibat pendustaan orang-orang yang menentangnya, Dia
berfirman, "Dan Kami sungguh-sungguh mengetahui, bahwa dadamu menjadi
sempit disebabkan apa yang mereka ucapkan, maka bertasbihlah dengan
memuji Rabbmu dan jadilah kamu di antara orang-orang yang bersujud
(salat), dan sembahlah Rabbmu sampai datang kepadamu yang diyakini
(ajal)." (Al-Hijr: 97 -- 99).
Sumber: Terjemahan Lubabut Tafsir Min Ibnu Katsir (Tafsir Ibnu Katsir), Tim Pustaka Imam as-Syafi'i
Kamis, 19 April 2012
SketchUp and Vray Resources: Making of Iwasa House by Ferry Sugianto
SketchUp and Vray Resources: Making of Iwasa House by Ferry Sugianto: Here is the Making of Iwasa House from our First-runner up from our Iwasa Challenge - Ferry Sugianto. He also provided some of his textures....
Selasa, 28 Februari 2012
SERI INFORMASI ISLAM: SYEIKH SAYYID JUMADIL KUBRO
SERI INFORMASI ISLAM: SYEIKH SAYYID JUMADIL KUBRO: SANG PERINTIS DAKWAH DI TANAH JAWA Batu Nisan Syeikh Sayyid Jumadil Kubro Posted by Syarifah Jameela, 19/1/2012 12:22:00 PM [http://m-i...
SERI INFORMASI ISLAM: MENYIBAK KERUNTUHAN MAJAPAHIT
SERI INFORMASI ISLAM: MENYIBAK KERUNTUHAN MAJAPAHIT: Peresensi: Ali Mahmudi CH Penyunting: Jodhi Yudono (Sumber: http://oase.kompas.com/read/2011/02/08/00583033/Menyibak.Keruntuhan.Majapahi...
SERI INFORMASI ISLAM: Benarkah Majapahit Sebuah Kerajaan Islam?
SERI INFORMASI ISLAM: Benarkah Majapahit Sebuah Kerajaan Islam?: (Sumber copas: http://beritatekhnologi.blogspot.com/2010/11/) Gapuro waringin Majapahit di Trowulan Benarkah Majapahit Sebua...
Senin, 30 Januari 2012
SketchUp and Vray Resources: Mini-The-Making Series 19_ Ahmad Solihin_Living ro...
SketchUp and Vray Resources: Mini-The-Making Series 19_ Ahmad Solihin_Living ro...: Welcome again to our another episode of our famous MTM series. This series features the making of beautiful renders using SketchUp and Vray ...
SketchUp and Vray Resources: Sketchup Modeling Series 8: Folded Towel by Fossil...
SketchUp and Vray Resources: Sketchup Modeling Series 8: Folded Towel by Fossil...: Welcome to our next segment of SketchUp Modeling Series. This one is from Fossils Fuel again, the modeling of folded towels. Thanks again F...
SketchUp and Vray Resources: Mini - The Making Series 18: Wahyu Bagus_Kids Bedr...
SketchUp and Vray Resources: Mini - The Making Series 18: Wahyu Bagus_Kids Bedr...: Back to our Mini-the-Making. We would like to share to everyone this beautiful Kids Bedroom done by Wahyu Bagus. Thank you Wahyu Bagus for a...
SketchUp and Vray Resources: Mini-The-Making Series No. 21_ Jenpol Sumatchaya_T...
SketchUp and Vray Resources: Mini-The-Making Series No. 21_ Jenpol Sumatchaya_T...: Our next MTM comes from Jenpol Sumatchaya of Thailand.. This electric guitar scene was inspired by this post at www.evermotion.org - The ...
SketchUp and Vray Resources: Mini-The Making Series No.23_ Mark Joseph Mercado
SketchUp and Vray Resources: Mini-The Making Series No.23_ Mark Joseph Mercado: Here is our next Mini The Making courtesy of Mark Joseph Mercado. Thanks Mark for this Christmas gift.
SketchUp and Vray Resources: Mini-The Making Series No.23_ Mark Joseph Mercado
SketchUp and Vray Resources: Mini-The Making Series No.23_ Mark Joseph Mercado: Here is our next Mini The Making courtesy of Mark Joseph Mercado. Thanks Mark for this Christmas gift.
SketchUp and Vray Resources: Vray Setting Visopt Series 2: Interior Daylight
SketchUp and Vray Resources: Vray Setting Visopt Series 2: Interior Daylight: We have started this new series called Vray Setting Visopt Series. Soon we will commence the Vray SketchUp Material Series or Vismats. For t...
SketchUp and Vray Resources: SketchUp Plugin: Artisan for Google SketchUp
SketchUp and Vray Resources: SketchUp Plugin: Artisan for Google SketchUp: Artisan is known as Subdivide and Smooth 2. Created by Dale Martens and its becoming a must plugin for SketchUp. Download the Free trial HER...
SketchUp and Vray Resources: Q and A : Jonathan Pagaduan Ignas
SketchUp and Vray Resources: Q and A : Jonathan Pagaduan Ignas: Q and A with Visualizer: Jonathan Pagaduan Ignas Hello everyone! Welcome again to our next episode of Questions and Answers time with som...
SketchUp and Vray Resources: Q and A : Jonathan Pagaduan Ignas
SketchUp and Vray Resources: Q and A : Jonathan Pagaduan Ignas: Q and A with Visualizer: Jonathan Pagaduan Ignas Hello everyone! Welcome again to our next episode of Questions and Answers time with som...
SketchUp and Vray Resources: Sketchup Modeling Series 6: Gas Lamp modeling by M...
SketchUp and Vray Resources: Sketchup Modeling Series 6: Gas Lamp modeling by M...: We would like to present to you this beautiful gas lamp model done by Mark Mikki. In this tutorial, Mark shows the different steps how he cr...
SketchUp and Vray Resources: Sketchup Modeling Series 5: Table Cloth modeling b...
SketchUp and Vray Resources: Sketchup Modeling Series 5: Table Cloth modeling b...: Here is our 5th Sketchup Modeling series courtesy again of Bayu Yudistiro.
SketchUp and Vray Resources: Sketchup Modeling Series 4: Padded modeling by DB ...
SketchUp and Vray Resources: Sketchup Modeling Series 4: Padded modeling by DB ...: First of all, we would like to thank DBrenders for this very nice tutorial using Artisan plugin for SketchUp. If you want to visit DB render...
SketchUp and Vray Resources: Sketchup Modeling Series 3: Padded Material by Bay...
SketchUp and Vray Resources: Sketchup Modeling Series 3: Padded Material by Bay...: Here is our SketchUp Modeling series 3 courtesy again of Bayu Yudistiro.
SketchUp and Vray Resources: Skechup Modeling Series No.2: Nomeradona's How to ...
SketchUp and Vray Resources: Skechup Modeling Series No.2: Nomeradona's How to ...: Hello Folks! This modeling series 2 is courtesy by yours truly. I have shared this one in my personal blog at www.nomeradona.blogspot.com bu...
SketchUp and Vray Resources: Sketchup Modeling Series 1: PIllow Tutorial: Bayu ...
SketchUp and Vray Resources: Sketchup Modeling Series 1: PIllow Tutorial: Bayu ...: We will be doing a lot of series. We started Mini-the-Making series which is very successful. This month we will be dong Vray option, Vray M...
SketchUp and Vray Resources: Mini - The Making Series 15: Bong Bernabe_Commerci...
SketchUp and Vray Resources: Mini - The Making Series 15: Bong Bernabe_Commerci...: Welcome again to our Mini-the making series. Thanks to Bong Bernabe for this excellent dusk scene of this commercial development. ...
SketchUp and Vray Resources: Tutorial: INTERIOR RENDERING " SU PODIUM"
SketchUp and Vray Resources: Tutorial: INTERIOR RENDERING " SU PODIUM": Here is a tutorial by Rosanna Mataloni on how to render interior using Podium. The model was done using Google SketchUp. Thanks to Rosanna...
SketchUp and Vray Resources: Vray Setting Visopt Series1
SketchUp and Vray Resources: Vray Setting Visopt Series1: I decided to post another series.. These are the users settings. Here is out first one courtesy of Mr.Teo of SUVN. Download Setting HERE ...
SketchUp and Vray Resources: "MiniThe Making" Series 14_ Darz Guarino_Modern Fi...
SketchUp and Vray Resources: "MiniThe Making" Series 14_ Darz Guarino_Modern Fi...: Hello guys. We would like to share our next MTM courtesy of Darz Guarino. This is a very simple and short MTM, but it will show you the sett...
SketchUp and Vray Resources: Download Free Vismat: Displaced Roof Shingles
SketchUp and Vray Resources: Download Free Vismat: Displaced Roof Shingles: Download HERE is the free roof shingle vismat with displaced map courtesy of Bayu Yudistiro of Indonesia.
SketchUp and Vray Resources: Tutorial: Chair Tutorial from Alvis
SketchUp and Vray Resources: Tutorial: Chair Tutorial from Alvis: How to model this? Here it is according to Alvis. Wire Frame Render
SketchUp and Vray Resources: Q & A: Omar Estevez
SketchUp and Vray Resources: Q & A: Omar Estevez: Hello everyone again. Welcome to another segment of Questions and Answers with famous visualizers. Our next featured artist is Omar Estevez...
SketchUp and Vray Resources: Grass tutorial using Fur Tool and Google SketchUp...
SketchUp and Vray Resources: Grass tutorial using Fur Tool and Google SketchUp...: Here is an excellent tutorial from Ricco Andrew Calda Cabigas. In this tutorial Ricco used a script called Fur tool by takhata. Download thi...
SketchUp and Vray Resources: Sketchup Texture Novemeber Rendering Challenge Top...
SketchUp and Vray Resources: Sketchup Texture Novemeber Rendering Challenge Top...: On 26th September 2010, Rosanna Mataloni founded this Facebook page- SketchUp Texture . At present it is being followed by more than 6000 us...
SketchUp and Vray Resources: Mini - The Making Series 10: Randy Lim's Night vie...
SketchUp and Vray Resources: Mini - The Making Series 10: Randy Lim's Night vie...: Here is our next post for our Mini-The -Making series courtesy again of Randy Rotor Lim. In this MTM, Randy use mostly basic settings, but t...
SketchUp and Vray Resources: Mini The Making Series 24_ Living Room by Mah Mude...
SketchUp and Vray Resources: Mini The Making Series 24_ Living Room by Mah Mude...: First of all, we would like to thank our Mini-The Making contributors from MTM 1 to this last one courtesy of Mah Mude. The series was so su...
SketchUp and Vray Resources: MTM Series 2012_No1_ Ubaid Danang Febrianto_"Casa ...
SketchUp and Vray Resources: MTM Series 2012_No1_ Ubaid Danang Febrianto_"Casa ...: Welcome to our new series of MTM or Mini-the-Making where contributors share their workflow, special set-ups, materials, settings and other ...
SketchUp and Vray Resources: Q and A : Rugchaipat Aphichortikhul
SketchUp and Vray Resources: Q and A : Rugchaipat Aphichortikhul: SVR Featured Artist: Rugchaipat Aphichortikhul Welcome 2012: Our first Featured artists comes from Thailand. He is Rugchaipat Aphichort...
SketchUp and Vray Resources: Tutorial: Converting your trees texture to NPR by ...
SketchUp and Vray Resources: Tutorial: Converting your trees texture to NPR by ...: Onel Pabico shared a very simple trick in Photoshop how to quickly do a library of NPR cutout trees. He also share how to automate the proce...
SketchUp and Vray Resources: MTM Series 2012: No.4_Setiawan Deddy's simple inte...
SketchUp and Vray Resources: MTM Series 2012: No.4_Setiawan Deddy's simple inte...: Good day again to our readers! Before we will share our next MTM, we just want to clarify what is MTM. Well MTM stands for Mini-the-Making. ...
SketchUp and Vray Resources: Sketchup Modeling Series 11: Rolled Towel modeling...
SketchUp and Vray Resources: Sketchup Modeling Series 11: Rolled Towel modeling...: Welcome again to another episode of our SketchUp Modeling Series. This time we would like to share Fossils Fuel's Rolled towel. It is a simp...
SketchUp and Vray Resources: Video: Section Animation in SketchUp
SketchUp and Vray Resources: Video: Section Animation in SketchUp: I am now very interested with animation. I like the tutorial animation done by Gerbe Dumahil HERE and also an animation done by Starsheep d...
SketchUp and Vray Resources: MTM Series 2012: No.5_Dy Up Ternoon's simple inter...
SketchUp and Vray Resources: MTM Series 2012: No.5_Dy Up Ternoon's simple inter...: Dy Up Ternoon is one of the upcoming Thai visualizers. We are very glad that he allowed us to share one of his render and do an MTM here. Th...
SketchUp and Vray Resources: Sketchup Modeling Series 12: "Beats" by Eldy Tende...
SketchUp and Vray Resources: Sketchup Modeling Series 12: "Beats" by Eldy Tende...: Here is a quick modeling tutorial shared by Eldy Tendero using SketchUp and scripts: Joint Push Pull Subdivide ans Smooth You can visit...
SketchUp and Vray Resources: MTM Series 2012_No.7_Burt Andrew Cimafranca's Mast...
SketchUp and Vray Resources: MTM Series 2012_No.7_Burt Andrew Cimafranca's Mast...: Here is another segment for our MTM Series 2012 courtesy this time of Burt Andrew Cimafranca. Render Image Workflow Sketchup Model scr...
SketchUp and Vray Resources: MTM Series 2012_No.8_Yogie Stars' Dining Area
SketchUp and Vray Resources: MTM Series 2012_No.8_Yogie Stars' Dining Area: We're glad to be graced by none other than Yogie Stars; one of the masters of VRAY SketchUp. You know what I mean once you have seen this ne...
SketchUp and Vray Resources: MTM Series 2012: No.10_Renos Siguonis' Dance Room
SketchUp and Vray Resources: MTM Series 2012: No.10_Renos Siguonis' Dance Room: First of all, we would like to thank Renos for this wonderful contribution. When we saw this render, we were really surprised with the quali...
SketchUp and Vray Resources: MTM Series 2012 No. 13 Randy Lim's Night Exterior
SketchUp and Vray Resources: MTM Series 2012 No. 13 Randy Lim's Night Exterior: Another segment here for our MTM Series 2012 coming again from one of the pride of the Philippines, Randy Lim. In this MTM Randy shared his ...
SketchUp and Vray Resources: MTMSeries2012 #14 Rugchaipat Aphichortikhul's Bedr...
SketchUp and Vray Resources: MTMSeries2012 #14 Rugchaipat Aphichortikhul's Bedr...: I must say this is a special MTM from one of the best visulaizers of Thailand using SketchUp and Vray SketchUp- Rugchaipat Aphichortikhul. I...
SketchUp and Vray Resources: MTMSeries2012 No.15 Mark Joseph Mercado's Sauna
SketchUp and Vray Resources: MTMSeries2012 No.15 Mark Joseph Mercado's Sauna: Good day everyone! Welcome again to our another segment of MTMSeries2012. We received lots of commendations so far with this new series and ...
SketchUp and Vray Resources: MTMSeries2012 No.16 by Mmhaw Tthoe Ttha
SketchUp and Vray Resources: MTMSeries2012 No.16 by Mmhaw Tthoe Ttha: Here is another entry for this MTM Series 2012. This time courtesy of Mmhaw Tthoe Ttha. Thank you Mmhaw for this entry. This is the finish...
SketchUp and Vray Resources: MTM Series 2012 No. 17 _Open Kitchen by Henry Widj...
SketchUp and Vray Resources: MTM Series 2012 No. 17 _Open Kitchen by Henry Widj...: This next MTM entry style is different from some of the MTM we have shared before, but Henry Widjaja has its own way in doing visualization....
SketchUp and Vray Resources: Tutorial: Converting a day scene with night scene ...
SketchUp and Vray Resources: Tutorial: Converting a day scene with night scene ...: This tutorial has been shared to us by Arch.Arnel Canaleja of Eastern Visayas State University Tacloban City. Tutorial Title: Converting a...
SketchUp and Vray Resources: Visualiser on the Spot: Afanasiev Ithil Anton
SketchUp and Vray Resources: Visualiser on the Spot: Afanasiev Ithil Anton: The works of Afanasiev Ithil Anton aka "Ithil" at are excellent example of maximizing the use of SketchUp as modelling software. He model hi...
SketchUp and Vray Resources: MTMSeries2012 No.16 by Mmhaw Tthoe Ttha
SketchUp and Vray Resources: MTMSeries2012 No.16 by Mmhaw Tthoe Ttha: Here is another entry for this MTM Series 2012. This time courtesy of Mmhaw Tthoe Ttha. Thank you Mmhaw for this entry. This is the finish...
SketchUp and Vray Resources: SketchUp Modeling Series # 14 "Bulol Sculpture" by...
SketchUp and Vray Resources: SketchUp Modeling Series # 14 "Bulol Sculpture" by...: First of all we would like to thank Eldy Tendero aka "tribal tuesday" for this excellent tutorial. So dear readers, here is the most awaite...
SketchUp and Vray Resources: MTM Series 2012 No. 17 _Open Kitchen by Henry Widj...
SketchUp and Vray Resources: MTM Series 2012 No. 17 _Open Kitchen by Henry Widj...: This next MTM entry style is different from some of the MTM we have shared before, but Henry Widjaja has its own way in doing visualization....
SketchUp and Vray Resources: Carpaint material in Vray SketchUp
SketchUp and Vray Resources: Carpaint material in Vray SketchUp: Jonathan Ignas shared this carpaint material setting using Vray Sketchup. Thanks and credit to Jonathan on this beautiful material. ...
SketchUp and Vray Resources: Spherical background without using HDRI in Vray Sk...
SketchUp and Vray Resources: Spherical background without using HDRI in Vray Sk...: Dennis, aka proseduction has shared his workflow how to use images as background without using HDRI. Here is his workflow. Denns' method: ...
SketchUp and Vray Resources: Lighting with V-Ray for SketchUp – definitive guid...
SketchUp and Vray Resources: Lighting with V-Ray for SketchUp – definitive guid...: Nomer continues his great collection of lighting tutorials to help you get to grips with and simplify this often complex proce...
SketchUp and Vray Resources: Omar Estevez the complete Vray Rendering process
SketchUp and Vray Resources: Omar Estevez the complete Vray Rendering process: Omar Esteves has shared these youtube videos that encompass the complete process of visualization from modeling to post processing. Thanks a...
SketchUp and Vray Resources: How to use Vray Channels in Vray SketchUp
SketchUp and Vray Resources: How to use Vray Channels in Vray SketchUp: VFB channels are separate layers saved by Vray SketchUp. The main purpose of this channels is for post processing using image editting softw...
SketchUp and Vray Resources: How to use Vray Channels in Vray SketchUp
SketchUp and Vray Resources: How to use Vray Channels in Vray SketchUp: VFB channels are separate layers saved by Vray SketchUp. The main purpose of this channels is for post processing using image editting softw...
SketchUp and Vray Resources: Peter Guthries' SketchUp
SketchUp and Vray Resources: Peter Guthries' SketchUp: This guy knows what he is saying. A biggie in visualization.
First of all I want to show the shadow in the entire scene and follow the steps...

Here's the scene with shadow setting...

Render Option
Clay Render setting

Sun setting

Clay Render with sun setting

Raw Image Render

After Post process
 |
| AFTERNOON SCENE |
Raw Image Render

After Post process
 |
| EARLY MORNING SCENE |
Raw Image Render

After Post process
 |
| NIGHT SCENE |
HDRI setting | Just load the HDRI image under bitmap "M"

Clay Render with HDRI setting

Raw Image Render

After Post process
 |
| NIGHT SCENE |
Jumat, 22 April 2011
Tutorial cepat Vray Sketchup Rendering
Tutorial ini dibuat oleh ANDRE PRADIKTHA bulan APRIL 2011 - Denpasar, Bali
dengan google sketchup pro 7.1 sketchup 1.48.98 dan Adobe Photoshop
modeling -> rendering -> post processing
untuk amateur sampai moderate (tidak direkomendasi untuk beginer (pasti bingung)
waktu belajar < 1 jam
saya dapat ilmu dari orang lain, harus memberikan juga ke orang lain.
1. pertama hal yang harus dilakukan ialah menyalurkan sebuah konsep / gagasan ke media seperti kertas daripada gagasan itu akhirnya menguap dan hilang... hehehe jangan langsung buka program 3d modeling seperti sketchup atau 3dsMax. karena orientasi program tersebut hanya untuk modeling. gagasan akan hilang dengan perlahan jika kita berkonsentrasi saat modeling.
lalu setelah mendapat ide dan inspirasi dan disalurkan, dapat dilanjutkan dengan proses modeling seperti pada gambar 1.

2. buatlah model secara global dulu untuk tau skala dan proporsinya, lalu lanjutkan dengan detail. jangan berpikir material dulu, setelah modeling selesai baru berpikir material.
jangan lupa buat grup pada objek2 dalam model. untuk memudahkan pengorganisasian model dan pengaplikasian material nantinya.
3. setelah selesai model, coba kerjakan material mulai dari yang tersulit terlebih dahulu, contohnya air, yang butuh penyesuaian. coba lakukan test render secara bertahap untuk tau kualitas render dalam scene.

pada gambar 2, sudah dirender dengan v-ray options default. GI - vray sun, engine yang digunakan irridiance map dan light cache. untuk membuat air, cukup buat layer reflection dan refraction. pada tanda 'm' di reflection pilih TexFresnel, kemudian di Reflection IOR turunkan jadi 1,33. untuk refraction tidak ada yang berubah, hanya fog color yang diubah menjadi warna hijau tua dan intensitynya dikurangi dari 0,5 jadi 0,1. untuk batu biasa saja, hanya diterapkan bump & displacement. Caranya, klik 'm' di masing2 opsi pada tab paling bawah material editor, lalu ubah jadi TexBitmap, pada tanda '...' pilih gambar grayscale (hitamputih) dari texture yang digunakan.
semuanya dapat diperoleh secara gratis di www.cgtextures.com
4. lanjtukan menerapkan material. lakukan test render. lakukan eksperimen lagi, dan seterusnya. masukkan juga model2 build-up dari luar. disini semua model (kecuali base model(rumah dan kolam)nya) didapatkan dari google 3D warehouse secara gratis.
5. setelah puas dengan hasilnya, mulailah mengatur kamera, setting physical kamera (vignette, shutter speed, F-stop, ISO) buat setting kamera sesuai dengan kondisi renderan.
disini juga digunakan HDRi (cari di google untuk keterangan HDRi lebih lanjut), HDRi didapat dari www.openfootage.net secara gratis.
untuk menggunakan HDRi agak susah, bila tidak mampu menggunakannya gunakan saja default lights dari vray.
hasil test rendernya dapat dilihat di gambar 3.
 6.
Ingat selalu percantik tiap renderanmu dengan komponen yang banyak dan
ditata sedemikian rupa sesuai dengan komposisi foto yang ideal
(mempelajari komposisi bisa dilakukan dengan sering melihat contoh foto
atau hasil renderan orang yang bagus2... hehe). semua model pelengkap
didapat dari google 3D warehouse. Terimakasih kepada google yang membuat
semuanya menakjubkan dengan program sketchupnya... hehehe
6.
Ingat selalu percantik tiap renderanmu dengan komponen yang banyak dan
ditata sedemikian rupa sesuai dengan komposisi foto yang ideal
(mempelajari komposisi bisa dilakukan dengan sering melihat contoh foto
atau hasil renderan orang yang bagus2... hehe). semua model pelengkap
didapat dari google 3D warehouse. Terimakasih kepada google yang membuat
semuanya menakjubkan dengan program sketchupnya... hehehe

7. setelah semua siap render, periksa lagi semua settingan apakah sudah oke atau belum. bila perlu memang diperlukan beberapa cahaya lagi untuk memperkuat suasana.
ingat pada setiap renderan kamu rahasianya ada pada warna dan mood serta 'angle' kamera yang kamu terapkan pada model. (contohnya model ini, sebenarnya sangat biasa saja (lihat gambar i dan ii). disini ditambahkan hanya 1 rectangular light dengan ukuran kira2 1mx1m, dengan seting warna=oranye/coklat muda, beri centang invisible, double-sided, store irridiance map, affect alpha, dan affect shadow, selebihnya semua default.


atur seting output, contoh disini menggunakan orientasi potrait, bukan landscape, atur semua sesuai selera dan komposisi ideal bagi modelmu. tekan bulat biru huruf 'R' utk render


jadi, yang perlu diingat:
-ide harus disimpan / didokumentasi
-modeling
-aplikasi material
-kamera dan mood / suasana model
-settingan render
-postprocessing dengan photoshop adalah senjata mutakhir!
trimakasih atas perhatiannya.
nantikan tutorial selanjutnya....
link for vray sketchup tutorial:
www.cgpinoy.org
www.sketchupartists.org
http://www.kaskus.us/showthread.php?t=7308021
dengan google sketchup pro 7.1 sketchup 1.48.98 dan Adobe Photoshop
modeling -> rendering -> post processing
untuk amateur sampai moderate (tidak direkomendasi untuk beginer (pasti bingung)
waktu belajar < 1 jam
saya dapat ilmu dari orang lain, harus memberikan juga ke orang lain.
1. pertama hal yang harus dilakukan ialah menyalurkan sebuah konsep / gagasan ke media seperti kertas daripada gagasan itu akhirnya menguap dan hilang... hehehe jangan langsung buka program 3d modeling seperti sketchup atau 3dsMax. karena orientasi program tersebut hanya untuk modeling. gagasan akan hilang dengan perlahan jika kita berkonsentrasi saat modeling.
lalu setelah mendapat ide dan inspirasi dan disalurkan, dapat dilanjutkan dengan proses modeling seperti pada gambar 1.

2. buatlah model secara global dulu untuk tau skala dan proporsinya, lalu lanjutkan dengan detail. jangan berpikir material dulu, setelah modeling selesai baru berpikir material.
jangan lupa buat grup pada objek2 dalam model. untuk memudahkan pengorganisasian model dan pengaplikasian material nantinya.
3. setelah selesai model, coba kerjakan material mulai dari yang tersulit terlebih dahulu, contohnya air, yang butuh penyesuaian. coba lakukan test render secara bertahap untuk tau kualitas render dalam scene.

pada gambar 2, sudah dirender dengan v-ray options default. GI - vray sun, engine yang digunakan irridiance map dan light cache. untuk membuat air, cukup buat layer reflection dan refraction. pada tanda 'm' di reflection pilih TexFresnel, kemudian di Reflection IOR turunkan jadi 1,33. untuk refraction tidak ada yang berubah, hanya fog color yang diubah menjadi warna hijau tua dan intensitynya dikurangi dari 0,5 jadi 0,1. untuk batu biasa saja, hanya diterapkan bump & displacement. Caranya, klik 'm' di masing2 opsi pada tab paling bawah material editor, lalu ubah jadi TexBitmap, pada tanda '...' pilih gambar grayscale (hitamputih) dari texture yang digunakan.
semuanya dapat diperoleh secara gratis di www.cgtextures.com
4. lanjtukan menerapkan material. lakukan test render. lakukan eksperimen lagi, dan seterusnya. masukkan juga model2 build-up dari luar. disini semua model (kecuali base model(rumah dan kolam)nya) didapatkan dari google 3D warehouse secara gratis.
5. setelah puas dengan hasilnya, mulailah mengatur kamera, setting physical kamera (vignette, shutter speed, F-stop, ISO) buat setting kamera sesuai dengan kondisi renderan.
disini juga digunakan HDRi (cari di google untuk keterangan HDRi lebih lanjut), HDRi didapat dari www.openfootage.net secara gratis.
untuk menggunakan HDRi agak susah, bila tidak mampu menggunakannya gunakan saja default lights dari vray.
hasil test rendernya dapat dilihat di gambar 3.


7. setelah semua siap render, periksa lagi semua settingan apakah sudah oke atau belum. bila perlu memang diperlukan beberapa cahaya lagi untuk memperkuat suasana.
ingat pada setiap renderan kamu rahasianya ada pada warna dan mood serta 'angle' kamera yang kamu terapkan pada model. (contohnya model ini, sebenarnya sangat biasa saja (lihat gambar i dan ii). disini ditambahkan hanya 1 rectangular light dengan ukuran kira2 1mx1m, dengan seting warna=oranye/coklat muda, beri centang invisible, double-sided, store irridiance map, affect alpha, dan affect shadow, selebihnya semua default.


atur seting output, contoh disini menggunakan orientasi potrait, bukan landscape, atur semua sesuai selera dan komposisi ideal bagi modelmu. tekan bulat biru huruf 'R' utk render
8. voila! setelah menunggu beberapa jam (tergantung
spesifikasi PC, kalau Quad core atau Hexa core bisa dalam hitungan
belasan menit, kalau pada PC yang digunakan AMD X2, bisa 3 jam! hehe).
eeit, hasilnya memang bisa mengecewakan (gambar 5). tapi masih perlu
diingat masih ada rahasia yang terakhir yang paling mutakhir
(postprocessing dgn photoshop!).
save outputnya dengan menjadi
png. mengapa dengan png, karena otomatis background menjadi alpha, dan
diaplikasikan anti-aliasing sehingga gambar menjadi lebih halus dan
tidak 'jaggy' seperti jpeg... hehe

9. buka gambar renderan di photoshop.
yang perlu diperhatikan disini hanyalah beberapa hal. jangan pusing2 dan ribet.
- brightness dan contrast
- level
- vibrance
- color burn and highlight
- smart sharpen
- penggunaan image sebagai background.
(yang diterapkan di image ini)
-brightness contrast (+26/+17)
-level (item=28/abu=1,02/putih 245)
-vibrance (pantengin ke +70)
-color
burn | highlight (terapkan dengan brush dan intensity rendah, bagian
yang bayang2 digelapin (burn) yang kena sinar terang (dihighlight)
sehingga nampak silau.
-smart sharpen amount (kurang dari seperempat slider), radius (seperempat lebih sedikit).
-penggunaan
image (disesuaikan sesuai selera, bisa cari di google, atau foto
sendiri panorama kenyataan. sesuaikan dengan mood dan suasana model /
render (letakkan background di layer paling bawah)).
10. sudah selesai.
hasilnya adalah seperti gambar 6.

jadi, yang perlu diingat:
-ide harus disimpan / didokumentasi
-modeling
-aplikasi material
-kamera dan mood / suasana model
-settingan render
-postprocessing dengan photoshop adalah senjata mutakhir!
trimakasih atas perhatiannya.
nantikan tutorial selanjutnya....
link for vray sketchup tutorial:
www.cgpinoy.org
www.sketchupartists.org
http://www.kaskus.us/showthread.php?t=7308021
Another Interior Rendering Footage
aku share lagi bagi yang berminat belajar rendering...
I'm sharing for anyone who interested in rendering...

1. i use all default Vray for SketchUp 1.48.98 setting, in georefrencing (sketchUp setting) i change it to Jakarta Indonesia, the north angle is about 200 degree. in indirect ilumination tab, i activated the ambient occlussion.

2. i make 4 pillars / coloums in every corner of the living, i made all mouldings and wall borders in this room by using 'follow me' tools in sketchup.

3. i put all the furniture right from the google 3Dwarehouse web, i download those furnitures, and make up the room more details. all the white colors that u see are made by check the override materials from global setting.

4. aku kembangin terus modelnya.
4. i've made improvements, by putting more furniture and rise the sun intensity in the GI 'm' (map) to about 1.5 camera setting shutter speed 100, iso 200, F-stop 11, vignette and exsposure.

5. setelah itu aku ilangin centang override materials-nya, dan aku buat material smua ini (sori satu persatu proses buat materialnya ku skip karena terlalu panjang ).
5. after all the process, i make a final render by applying all materials into my scene. (sorry for the skipped process of creating all the materials, due the process is too long).

Voila!
6. after getting the final render image, then i forward to the post-processing step w/ image editor programs (like adobe photoshop/GIMP). i put background image (google image), tambah brigthness, contrast, vibrance, levels, shadow/highlight, smart sharpen.
Voila!
Thanks for ur attention
see u next time
-Andre Pradiktha- author
Kamis, 28 April 2011
Vray Material Concrete and Wood Detailed
Bonjour!
jumpa lagi, dan share lagi tentang pembuatan material kayu dan beton di vray for sketchup...
we meet again, and now i'm sharing about creating wood material and concrete in vray for sketchup...
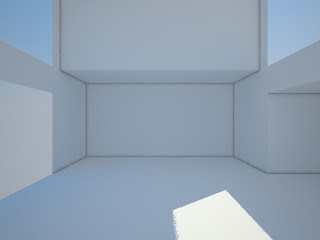
1. as usual u need to create ambient environment model as u like and prefer. (i prefer used all vray default visopt). except ambient occlusion for definitive borders.
1. seperti biasa, kamu ciptakan dulu ruang dengan tata ruang yang kamu suka. aku pake semua opsi vray default, kecuali ambient occlusion untuk dapet garis tembok.
 aku buat seperti ini, jangan terapkan material dulu
i built it like this, at the moment, don't apply ur material.
2. i continue to develop the room, i create a window on the right wall, so i let the sunlight pass my room.
2. aku terus kembangkan ruangan ini, aku buat jendela di tembok sebelah kanan agar cahaya alami dapat masuk dalam ruang.
3. i think it's almost done modeling the room, i made the wall thickness for real looks. i add a door in the right.
3. sudah hampir selesai, aku tebalkan temboknya dan tambah pintu di bagian kanan.

4. time to apply material, i apply it from sketchup not from vray. it should be like below images.
4. saatnya buat material, aku terapkan material dari sketchupnya bukan dari vray. hasilnya seperti gambar dibawah.
 material yang aku pake:
the materials that i used:


 find out in www.cgtextures.com ; it's free.
cari di www.cgtextures.com ; semuanya gratis.
5. in order to get the realness (realistic) of the material, basicly every material absorp and reflect the sun light, creating depth on those materials. so i create reflection layer on all materials.
5. untuk mencapai hasil yang realistik, pada dasarnya semua bahan menyerap dan memantulkan cahaya. jadi aku buat reflection layer pada semua material.
 pada "M" pilih TexFresnel. IOR value untuk kayu aku pilih 2.1; untuk beton semuanya default (1.55)
result:
hasilnya:

6. too glossy, isn't it? then to create depth 3D effect i apply bump & displacement method.
6. agak mengkilap ya? lalu untuk membuat material terlihat lebih realistis (timbul), aplikasikan bump map, dan displacement.


make sure u use grayscale (desaturate) images for either bump or displacement texture map. on the "bump" and "displacement click the "M" and select on the left (TexBitmap).
pastikan kamu pake tekstur yang item putih (grayscale) untuk bump dan displacementnya.
klik "M" pada tab map, lalu pilih TexBitmap, dan pada "..." pilih image bump yang sudah kamu buat
6.1. example; creating bump and/or displacement texture
6.1. contoh membuat tekstur bump displacement

result:
hasil:
>>>belum ada bump & displacement
>>>no bump & displacement
 >> applied bump & displacement.


jumpa lagi, dan share lagi tentang pembuatan material kayu dan beton di vray for sketchup...
we meet again, and now i'm sharing about creating wood material and concrete in vray for sketchup...
1. as usual u need to create ambient environment model as u like and prefer. (i prefer used all vray default visopt). except ambient occlusion for definitive borders.
1. seperti biasa, kamu ciptakan dulu ruang dengan tata ruang yang kamu suka. aku pake semua opsi vray default, kecuali ambient occlusion untuk dapet garis tembok.

i built it like this, at the moment, don't apply ur material.
2. i continue to develop the room, i create a window on the right wall, so i let the sunlight pass my room.
2. aku terus kembangkan ruangan ini, aku buat jendela di tembok sebelah kanan agar cahaya alami dapat masuk dalam ruang.

3. i think it's almost done modeling the room, i made the wall thickness for real looks. i add a door in the right.
3. sudah hampir selesai, aku tebalkan temboknya dan tambah pintu di bagian kanan.

4. time to apply material, i apply it from sketchup not from vray. it should be like below images.
4. saatnya buat material, aku terapkan material dari sketchupnya bukan dari vray. hasilnya seperti gambar dibawah.

the materials that i used:


cari di www.cgtextures.com ; semuanya gratis.
5. in order to get the realness (realistic) of the material, basicly every material absorp and reflect the sun light, creating depth on those materials. so i create reflection layer on all materials.
5. untuk mencapai hasil yang realistik, pada dasarnya semua bahan menyerap dan memantulkan cahaya. jadi aku buat reflection layer pada semua material.

result:
hasilnya:

6. too glossy, isn't it? then to create depth 3D effect i apply bump & displacement method.
6. agak mengkilap ya? lalu untuk membuat material terlihat lebih realistis (timbul), aplikasikan bump map, dan displacement.


make sure u use grayscale (desaturate) images for either bump or displacement texture map. on the "bump" and "displacement click the "M" and select on the left (TexBitmap).
pastikan kamu pake tekstur yang item putih (grayscale) untuk bump dan displacementnya.
klik "M" pada tab map, lalu pilih TexBitmap, dan pada "..." pilih image bump yang sudah kamu buat
6.1. example; creating bump and/or displacement texture
6.1. contoh membuat tekstur bump displacement

result:
hasil:
>>>no bump & displacement
 >> applied bump & displacement.
7. it's time to add HDRi background
7. saatnya menerapkan latar gambar HDRi
HDRi
(High Dynamic Range image) is image that can produce virtual light
based on the color samples in that image, every pixel emit different
light color depends on that pixel color, this method in CG is often
called IBL method (Image Based Lighting), more information >> www.hdrlabs.com/sibl/

i get the hdri file from, www.openfootage.net >> don't forget to contribute and support them.
aku dapat file hdri dari www.openfootage.net >> jangan lupa untuk berkontribusi kpd mereka.
result:
hasil:

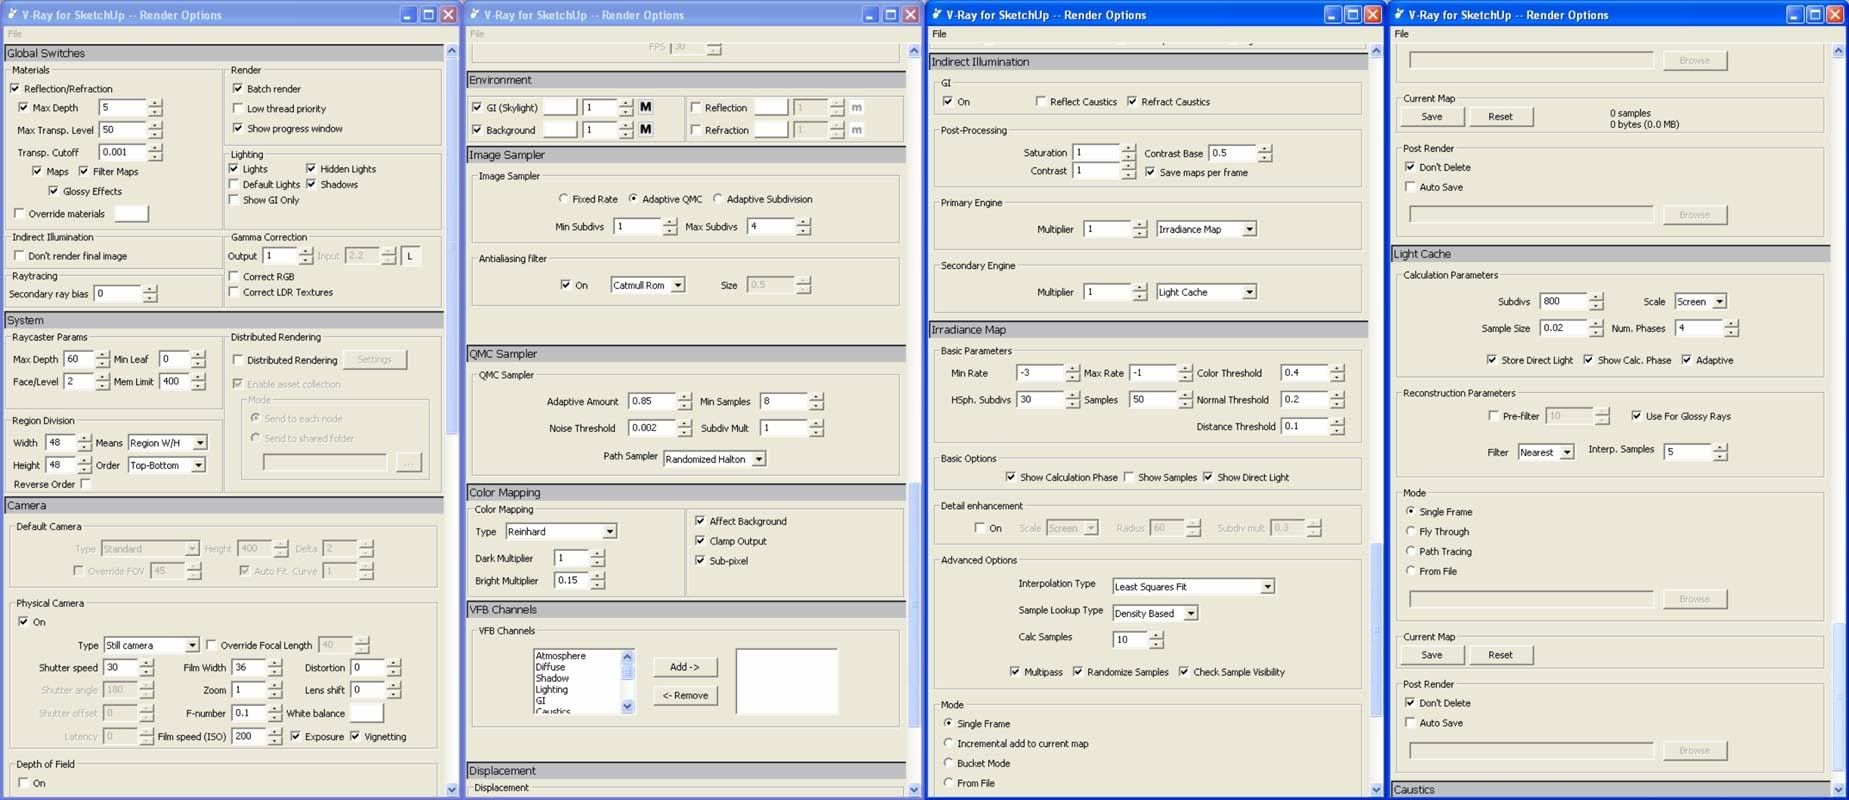
at last, this is my vray options:
terakhir, ini opsi vray yang aku pake:


all
specification: Google SketchUp 7.1 pro, ASGVIS Vray for SketchUp
1.48.98 (the latest is 1.49.01) Windows XP SP3 32-bit. AMD Athlon X2,
2Gb memory, AMD HD4670
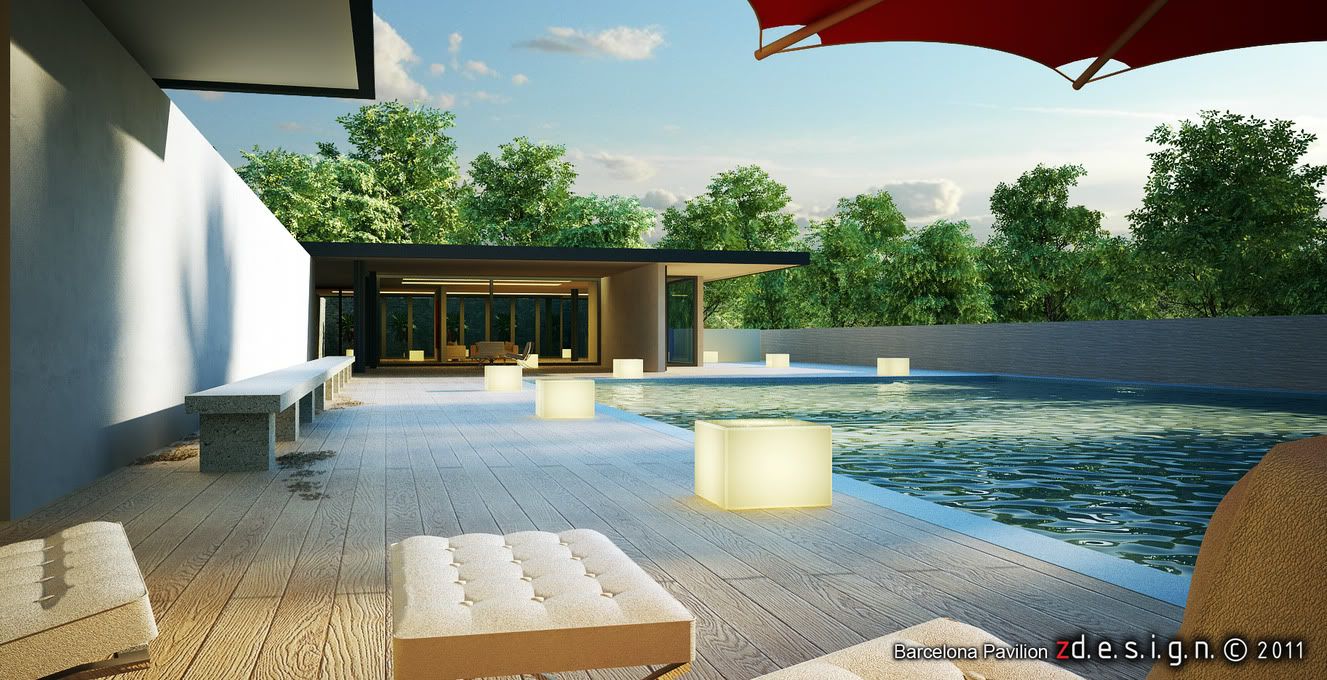
a final render:

all models can be downloaded through google 3D warehouse for free redistributing.
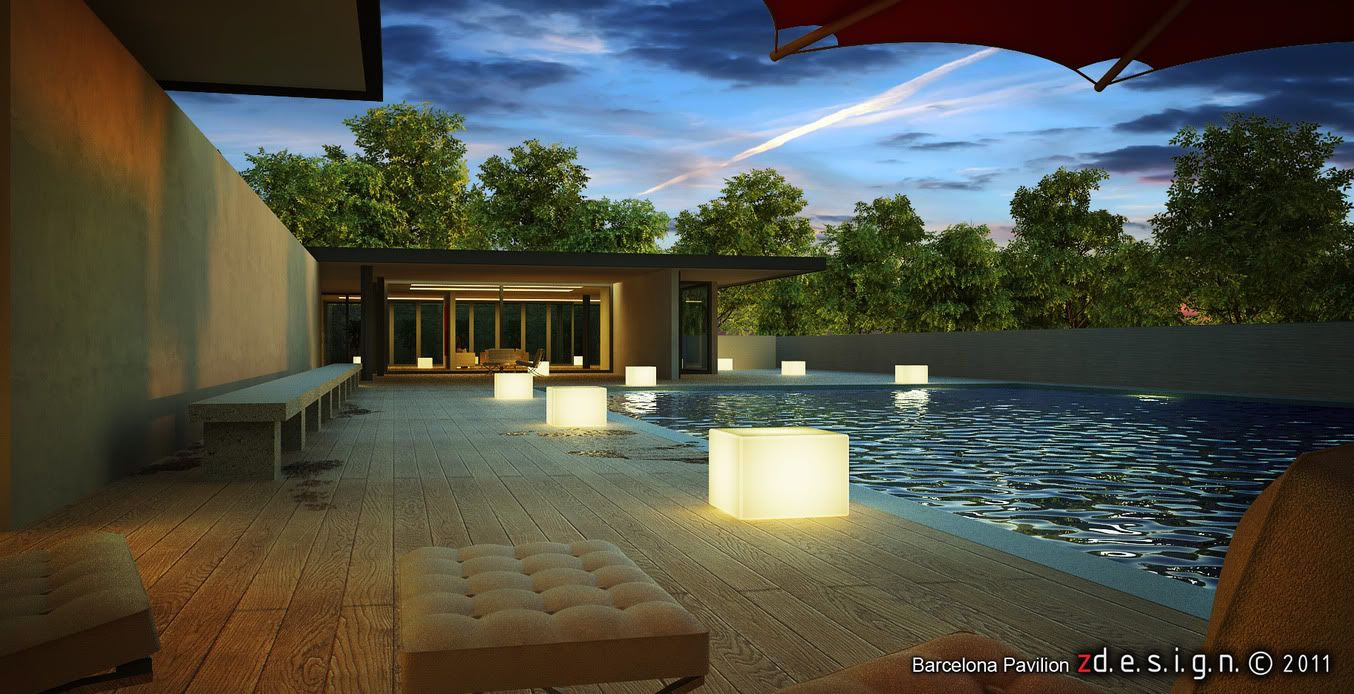
Voila! after post-processing in photoshop (read my another tutorials):

people cut-out can be downloaded from vizpeople (freesample).
terimakasih atas perhatiannya...
thank you for ur attention...
see u next time.
Langgan:
Poskan Komentar (Atom)
Langganan:
Postingan (Atom)
2 komen: