
Kamis, 28 April 2011
Vray Material Concrete and Wood Detailed
Bonjour!
jumpa lagi, dan share lagi tentang pembuatan material kayu dan beton di vray for sketchup...
we meet again, and now i'm sharing about creating wood material and concrete in vray for sketchup...
1. as usual u need to create ambient environment model as u like and prefer. (i prefer used all vray default visopt). except ambient occlusion for definitive borders.
1. seperti biasa, kamu ciptakan dulu ruang dengan tata ruang yang kamu suka. aku pake semua opsi vray default, kecuali ambient occlusion untuk dapet garis tembok.
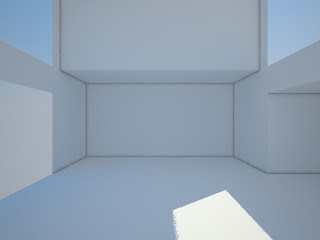
 aku buat seperti ini, jangan terapkan material dulu
i built it like this, at the moment, don't apply ur material.
2. i continue to develop the room, i create a window on the right wall, so i let the sunlight pass my room.
2. aku terus kembangkan ruangan ini, aku buat jendela di tembok sebelah kanan agar cahaya alami dapat masuk dalam ruang.
3. i think it's almost done modeling the room, i made the wall thickness for real looks. i add a door in the right.
3. sudah hampir selesai, aku tebalkan temboknya dan tambah pintu di bagian kanan.

4. time to apply material, i apply it from sketchup not from vray. it should be like below images.
4. saatnya buat material, aku terapkan material dari sketchupnya bukan dari vray. hasilnya seperti gambar dibawah.
 material yang aku pake:
the materials that i used:


 find out in www.cgtextures.com ; it's free.
cari di www.cgtextures.com ; semuanya gratis.
5. in order to get the realness (realistic) of the material, basicly every material absorp and reflect the sun light, creating depth on those materials. so i create reflection layer on all materials.
5. untuk mencapai hasil yang realistik, pada dasarnya semua bahan menyerap dan memantulkan cahaya. jadi aku buat reflection layer pada semua material.
 pada "M" pilih TexFresnel. IOR value untuk kayu aku pilih 2.1; untuk beton semuanya default (1.55)
result:
hasilnya:

6. too glossy, isn't it? then to create depth 3D effect i apply bump & displacement method.
6. agak mengkilap ya? lalu untuk membuat material terlihat lebih realistis (timbul), aplikasikan bump map, dan displacement.


make sure u use grayscale (desaturate) images for either bump or displacement texture map. on the "bump" and "displacement click the "M" and select on the left (TexBitmap).
pastikan kamu pake tekstur yang item putih (grayscale) untuk bump dan displacementnya.
klik "M" pada tab map, lalu pilih TexBitmap, dan pada "..." pilih image bump yang sudah kamu buat
6.1. example; creating bump and/or displacement texture
6.1. contoh membuat tekstur bump displacement

result:
hasil:
>>>belum ada bump & displacement
>>>no bump & displacement
 >> applied bump & displacement.


jumpa lagi, dan share lagi tentang pembuatan material kayu dan beton di vray for sketchup...
we meet again, and now i'm sharing about creating wood material and concrete in vray for sketchup...
1. as usual u need to create ambient environment model as u like and prefer. (i prefer used all vray default visopt). except ambient occlusion for definitive borders.
1. seperti biasa, kamu ciptakan dulu ruang dengan tata ruang yang kamu suka. aku pake semua opsi vray default, kecuali ambient occlusion untuk dapet garis tembok.

i built it like this, at the moment, don't apply ur material.
2. i continue to develop the room, i create a window on the right wall, so i let the sunlight pass my room.
2. aku terus kembangkan ruangan ini, aku buat jendela di tembok sebelah kanan agar cahaya alami dapat masuk dalam ruang.

3. i think it's almost done modeling the room, i made the wall thickness for real looks. i add a door in the right.
3. sudah hampir selesai, aku tebalkan temboknya dan tambah pintu di bagian kanan.

4. time to apply material, i apply it from sketchup not from vray. it should be like below images.
4. saatnya buat material, aku terapkan material dari sketchupnya bukan dari vray. hasilnya seperti gambar dibawah.

the materials that i used:


cari di www.cgtextures.com ; semuanya gratis.
5. in order to get the realness (realistic) of the material, basicly every material absorp and reflect the sun light, creating depth on those materials. so i create reflection layer on all materials.
5. untuk mencapai hasil yang realistik, pada dasarnya semua bahan menyerap dan memantulkan cahaya. jadi aku buat reflection layer pada semua material.

result:
hasilnya:

6. too glossy, isn't it? then to create depth 3D effect i apply bump & displacement method.
6. agak mengkilap ya? lalu untuk membuat material terlihat lebih realistis (timbul), aplikasikan bump map, dan displacement.


make sure u use grayscale (desaturate) images for either bump or displacement texture map. on the "bump" and "displacement click the "M" and select on the left (TexBitmap).
pastikan kamu pake tekstur yang item putih (grayscale) untuk bump dan displacementnya.
klik "M" pada tab map, lalu pilih TexBitmap, dan pada "..." pilih image bump yang sudah kamu buat
6.1. example; creating bump and/or displacement texture
6.1. contoh membuat tekstur bump displacement

result:
hasil:
>>>no bump & displacement
 >> applied bump & displacement.
7. it's time to add HDRi background
7. saatnya menerapkan latar gambar HDRi
HDRi
(High Dynamic Range image) is image that can produce virtual light
based on the color samples in that image, every pixel emit different
light color depends on that pixel color, this method in CG is often
called IBL method (Image Based Lighting), more information >> www.hdrlabs.com/sibl/

i get the hdri file from, www.openfootage.net >> don't forget to contribute and support them.
aku dapat file hdri dari www.openfootage.net >> jangan lupa untuk berkontribusi kpd mereka.
result:
hasil:

at last, this is my vray options:
terakhir, ini opsi vray yang aku pake:


all
specification: Google SketchUp 7.1 pro, ASGVIS Vray for SketchUp
1.48.98 (the latest is 1.49.01) Windows XP SP3 32-bit. AMD Athlon X2,
2Gb memory, AMD HD4670
a final render:

all models can be downloaded through google 3D warehouse for free redistributing.
Voila! after post-processing in photoshop (read my another tutorials):

people cut-out can be downloaded from vizpeople (freesample).
terimakasih atas perhatiannya...
thank you for ur attention...
see u next time.
Langgan:
Poskan Komentar (Atom)


2 komen: